Inventory Manager
Updated on November 9th, 2021 at 1:09 am
What is it?
This was a course project that I completed for my first Java Class at my undergraduate university. The class was labeled Basic Java Concepts and covered all of the major foundations that make up the Java language. Classes with abstraction, interfaces, constructors, inheritance, etc. are some of the many topics discussed in that course. The JavaFX framework was also briefly taught and was used to build the final project.
The project was focused specifically on the software development phase of the SDLC (Software Development Life Cycle) so a project information document, a UML class diagram, and a GUI mockup document were all provided to complete the project. The screens that make up the application were directly modeled after the GUI mockup document. They are not of my own design.
What does it do?
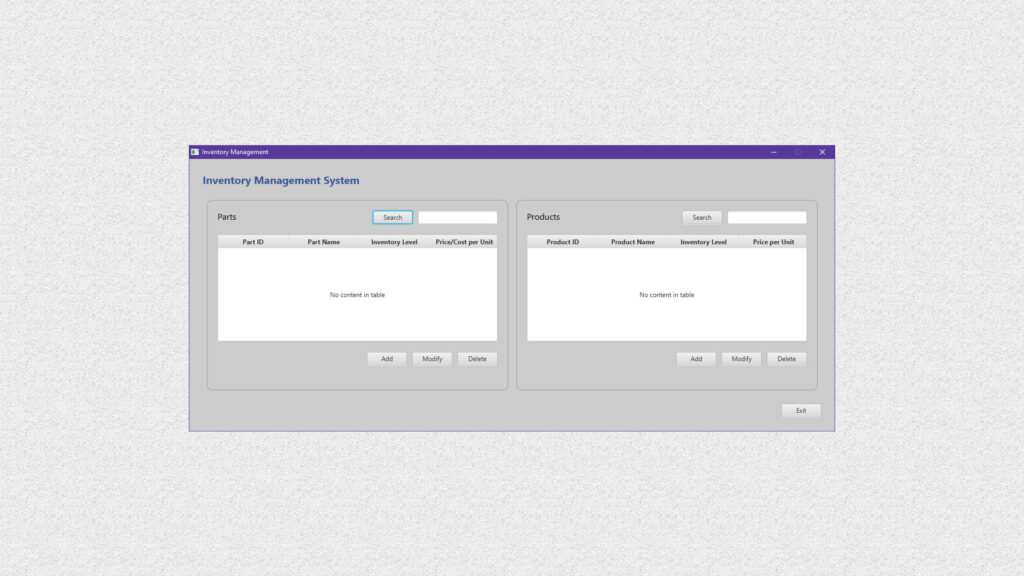
The Inventory Manager does just as it sounds. It manages inventory. The items are split between two types: Products and Parts. Both have information regarding the items including their name, their supply in your inventory, their price, and the minimum/maximum amount of those items that can fit in your inventory. Products are unique in that they can have associated parts. The idea is that every product can have one or many parts. Parts are unique in that they have two sub-types labeled “In House” and “Outsourced” which indicated whether the part was made by your company or if it was imported. Parts also have an additional field of data. They can have a Machine ID if they are an In-House part or a Company Name if they are an Outsourced part.
Basically, the Inventory Manager is used to keep track of parts and products in an inventory. Add a part, modify a part, add a product, associate a part to it, and repeat. There are also search engines on the main screen and product screens to search for parts/products in your inventory.
How does it work?
The Inventory Manager was made completely with Java and JavaFX. The application consists of 5 screens, which means there are 5 JavaFX views and 5 controllers that manage the interface. Collectively there are 11 class files with one of them being the initializer and main method for the application. The Main.java file sets global variables and data sets that will be accessed by other classes across the application. It also includes the handleSceneChange method that will be called each time a new view needs to display.
Main.java handleSceneChange()
import javafx.stage.Stage;

public class Main extends Application {

    public static Stage stage;
    private static Inventory inventory = new Inventory();
    // General scene changer for all scenes
    public static void handleSceneChange(String FXMLFile) throws IOException {

        Parent viewFile = FXMLLoader.load(InventoryController.class.getResource(FXMLFile));
        Scene scene = new Scene(viewFile);

        Stage stage = getStage();
        stage.setScene(scene);
        stage.setResizable(false);
        stage.show();

        // Alert for closing the window if there is at least one Part or Product in the inventory
        stage.setOnCloseRequest(new EventHandler<WindowEvent>() {
            @Override
            public void handle(WindowEvent event) {
                if (!inventory.getAllParts().isEmpty() || !inventory.getAllProducts().isEmpty()) {
                    exitConfirmationAlert.showAndWait();
                    if (exitConfirmationAlert.getResult() == ButtonType.YES) {
                        Platform.exit();
                    } else event.consume();
                } else Platform.exit();
            }
        });
    }
     public static Stage getStage() {
        return stage;
    }
}
The method works by setting a Parent viewFile to a JavaFX FXML file which contains specialized XML tags exclusive to JavaFX. It will then create a new scene from the viewFile, create a new stage off of the Main files getter, and then set some attributes to that stage. The show() method will handle the display of the new scene. the stage.setOnCloseRequest method is used to show a confirmation alert when the user tries to exit the screen without saving.
Inventory.java
public class Inventory {

    private ObservableList<Part> allParts = FXCollections.observableArrayList();
    private ObservableList<Product> allProducts = FXCollections.observableArrayList();

    public void addPart(Part newPart) {
        allParts.add(newPart);
    }

    public void addProduct(Product newProduct) { allProducts.add(newProduct); }

    public Part lookupPart(int partId) {
        Part part = null;
        for (Part item:allParts) {
            if (item.getId() == partId) {
                part = item;
                break;
            }
        }
        return part;
    }

    public Product lookupProduct(int productId) {
        Product product = null;
        for (Product item:allProducts) {
            if (item.getId() == productId) {
                product = item;
                break;
            }
        }
        return product;
    }

    public ObservableList<Part> lookupPart(String partName) {

        // Create an array of results that match the search field
        ObservableList<Part> queryMatches = FXCollections.observableArrayList();
        for (Part part:getAllParts()) {
            if (part.getName().toLowerCase().contains(partName.toLowerCase())) {
                queryMatches.add(part);
            }
        }

        return queryMatches;
    }

    public ObservableList<Product> lookupProduct(String productName) {

        // Create an array of results that match the search field
        ObservableList<Product> queryMatches = FXCollections.observableArrayList();
        for (Product product:getAllProducts()) {
            if (product.getName().toLowerCase().contains(productName.toLowerCase())) {
                queryMatches.add(product);
            }
        }

        return queryMatches;
    }

    public void updatePart(int index, Part selectedPart) { allParts.set(index, selectedPart); }

    public void updateProduct(int index, Product selectedProduct) { allProducts.set(index, selectedProduct); }

    public boolean deletePart(Part selectedPart) { return allParts.remove(selectedPart); }

    public boolean deleteProduct(Product selectedProduct) { return allProducts.remove(selectedProduct); }

    public ObservableList<Part> getAllParts() { return allParts; }

    public ObservableList<Product> getAllProducts() { return allProducts; }
}
The Inventory.java file is the main class file that manages the creation, manipulation, and removal of Parts and Products in the application. The Parts and Products are represented as objects in the allParts and allProducts lists. In JavaFX, each list needs to be of the ObservableList type in order to exist in a visual table. lookupPart and lookupProduct are used in the search engines for some of the views. The other class files (Part.java, Product.java, Outsourced.java, and InHouse.java) have constructors to create those types of objects. They also contain internal getter/setter methods to obtain and update the properties of their associated objects. Part.java is shown below with its internal methods.
import javafx.beans.property.SimpleStringProperty;

public abstract class Part {

    private int id;
    private SimpleStringProperty name;
    private double price;
    private int stock, min, max;

    public Part(int id, String name, double price, int stock, int min, int max) {
        this.id = id;
        this.name = new SimpleStringProperty(name);
        this.price = price;
        this.stock = stock;
        this.min = min;
        this.max = max;
    }

    public void setId(int id) { this.id = id; }

    public void setName(String name) { this.name.set(name); }

    public void setPrice(double price) { this.price = price; }

    public void setStock(int stock) { this.stock = stock; }

    public void setMin(int min) { this.min = min; }

    public void setMax(int max) { this.max = max; }

    public int getId() { return id; }

    public String getName() { return name.get(); }

    public double getPrice() { return price; }

    public int getStock() { return stock; }

    public int getMin() { return min; }

    public int getMax() { return max; }
}
Object Class Files vs. Controller Class Files
The files Inventory.java, Part.java, Product.java, Outsourced.java, and InHouse.java are all Object Class files meaning that they represent instances of data within the application. In the Model View Controller (MVC) architecture, these represent the Models that control the data of the application.
The files InventoryController, AddPartController, AddProductController, ModifyPartController, and ModifyProductController are Controller Class files, meaning that they control the interaction of data within the application. In the MVC architecture, the controllers manage interactions of data between the Models and the Views. If a user types data into a field in a view, the controller is responsible for using the methods from the Models to create data from that field input. An example of this is the AddPartController where an object is created from clicking the save button in a form, after all of the fields are populated of course.
public class AddPartController {

    @FXML private RadioButton inhouseRadio;
    @FXML private RadioButton outsourcedRadio;
    @FXML private TextField idField;
    @FXML private TextField nameField;
    @FXML private TextField stockField;
    @FXML private TextField priceField;
    @FXML private TextField maxField;
    @FXML private TextField minField;
    @FXML private TextField compMachField;
    @FXML private Text compMachLabel;

  	...

	// Save Part Button
    @FXML
    private void savePart(ActionEvent event) {

        checkForm();

        try {

            // Create a new part and add it to the allParts array
            if (isOutsourced) {
                Outsourced newOutsourcedPart = new Outsourced(
                        Main.getNextPartNum(),
                        nameField.getText(),
                        (!priceField.getText().equals("") ? Double.parseDouble(priceField.getText()) : 0.0),
                        (!stockField.getText().equals("") ? Integer.parseInt(stockField.getText()) : 0),
                        (!minField.getText().equals("") ? Integer.parseInt(minField.getText()) : 0),
                        (!maxField.getText().equals("") ? Integer.parseInt(maxField.getText()) : 0),
                        compMachField.getText()
                );
                inventory.addPart(newOutsourcedPart);

            } else {
                InHouse newInHousePart = new InHouse(
                        Main.getNextPartNum(),
                        nameField.getText(),
                        (!priceField.getText().equals("") ? Double.parseDouble(priceField.getText()) : 0.0),
                        (!stockField.getText().equals("") ? Integer.parseInt(stockField.getText()) : 0),
                        (!minField.getText().equals("") ? Integer.parseInt(minField.getText()) : 0),
                        (!maxField.getText().equals("") ? Integer.parseInt(maxField.getText()) : 0),
                        (!compMachField.getText().equals("") ? Integer.parseInt(compMachField.getText()) : 0)
                );
                inventory.addPart(newInHousePart);
            }

            Main.handleSceneChange("Inventory.fxml");
        } catch (IOException ex) {
            ex.printStackTrace();
        }
    }
	...
}
Views
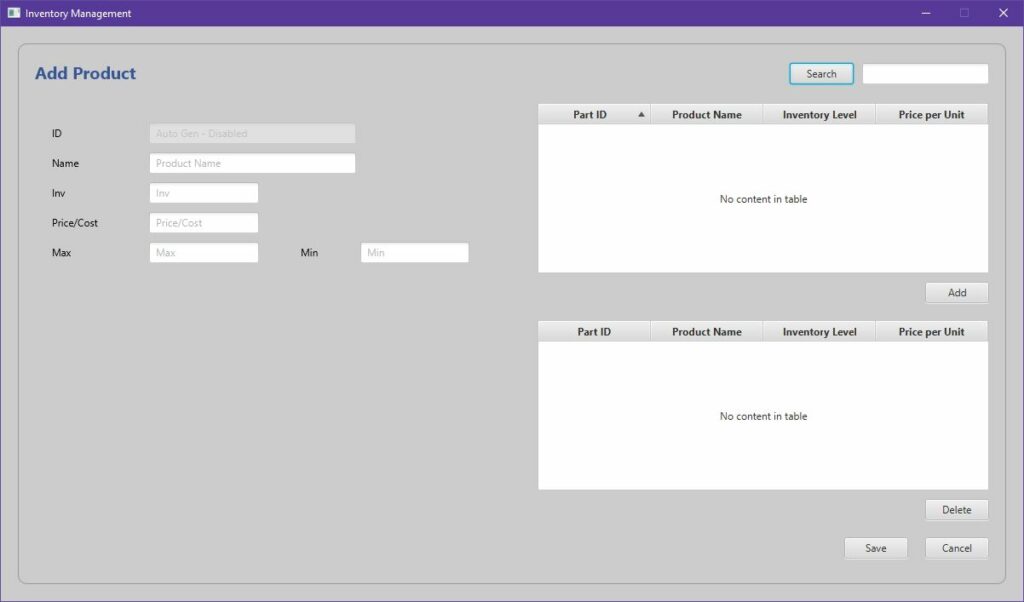
JavaFX utilizes the Model View Controller (MVC) architecture to create applications. The Views are written in a modified version of the Extended Markup Language (XML) called FXML. The scripts are a lot like XML, but contain specific tags relating to the layouts and input controls provided by JavaFX. As an example, here is part of the AddPart.fxml file below. It creates the labels and text fields that make up most of the screen.
<?xml version="1.0" encoding="UTF-8"?>

<?import javafx.geometry.Insets?>
<?import javafx.scene.control.Button?>
<?import javafx.scene.control.RadioButton?>
<?import javafx.scene.control.TextField?>
<?import javafx.scene.control.ToggleGroup?>
<?import javafx.scene.layout.AnchorPane?>
<?import javafx.scene.layout.ColumnConstraints?>
<?import javafx.scene.layout.GridPane?>
<?import javafx.scene.layout.HBox?>
<?import javafx.scene.layout.RowConstraints?>
<?import javafx.scene.layout.VBox?>
<?import javafx.scene.text.Font?>
<?import javafx.scene.text.Text?>

<AnchorPane maxHeight="-Infinity" maxWidth="-Infinity" minHeight="-Infinity" minWidth="-Infinity" prefHeight="350.0" prefWidth="450.0" style="-fx-background-color: #ccc;" xmlns="http://javafx.com/javafx/8.0.171" xmlns:fx="http://javafx.com/fxml/1" fx:controller="scenes.AddPartController">
   <children>
      <VBox AnchorPane.leftAnchor="0.0" AnchorPane.rightAnchor="0.0" AnchorPane.topAnchor="0.0">
         <padding>
            <Insets left="20.0" top="20.0" />
         </padding>
         <children>
  		...
		<GridPane alignment="CENTER" hgap="5.0" vgap="5.0">
  <children>
                  <Text strokeType="OUTSIDE" strokeWidth="0.0" text="ID" />
                  <Text strokeType="OUTSIDE" strokeWidth="0.0" text="Name" GridPane.rowIndex="1" />
                  <Text strokeType="OUTSIDE" strokeWidth="0.0" text="Inv" GridPane.rowIndex="2" />
                  <Text strokeType="OUTSIDE" strokeWidth="0.0" text="Price/Cost" GridPane.rowIndex="3" />
                  <Text strokeType="OUTSIDE" strokeWidth="0.0" text="Max" GridPane.rowIndex="4" />
                  <Text strokeType="OUTSIDE" strokeWidth="0.0" text="Min" GridPane.columnIndex="2" GridPane.halignment="CENTER" GridPane.rowIndex="4" />
                  <Text fx:id="compMachLabel" strokeType="OUTSIDE" strokeWidth="0.0" text="Company Name" GridPane.rowIndex="5" />
                  <TextField fx:id="idField" disable="true" editable="false" promptText="Auto Gen - Disabled" GridPane.columnIndex="1" GridPane.columnSpan="2" />
                  <TextField fx:id="nameField" promptText="Part Name" GridPane.columnIndex="1" GridPane.columnSpan="2" GridPane.rowIndex="1" />
                  <TextField fx:id="stockField" promptText="Inv" GridPane.columnIndex="1" GridPane.columnSpan="2" GridPane.rowIndex="2" />
                  <TextField fx:id="priceField" promptText="Price/Cost" GridPane.columnIndex="1" GridPane.columnSpan="2" GridPane.rowIndex="3" />
                  <TextField fx:id="maxField" promptText="Max" GridPane.columnIndex="1" GridPane.rowIndex="4" />
                  <TextField fx:id="minField" promptText="Min" GridPane.columnIndex="3" GridPane.rowIndex="4" />
                  <TextField fx:id="compMachField" promptText="Comp Nm" GridPane.columnIndex="1" GridPane.columnSpan="2" GridPane.rowIndex="5" />
               </children>
               <padding>
                  <Insets bottom="20.0" left="40.0" right="40.0" top="20.0" />
               </padding>
            </GridPane>
			...
		</children>
      </VBox>
   </children>
</AnchorPane>